From Syllabus to Canvas
Created by Tommy Murphy and Suzanne Thompson
For this tutorial, we are going to create a basic Canvas course structure using a course syllabus as the design inspiration. The Engineering Department was kind enough to allow us to use their EGR 211 course syllabus as the sample to build from.
Let’s take a look at the sample syllabus.
The syllabus above contains:
- The course title, description, resources, and the learning goals
- Class location and times.
- Contact information for the faculty and TAs
- Classroom policies and procedures
- A grading schema
- A tentative course schedule
- BONUS, an image that we can use as a course tile cover in Canvas
From our sample syllabus, we will be able to build out the following components of our Canvas course:
- The syllabus
- Course assignment groups from the syllabus grading schema
- Course assignments from the syllabus schedule
- Course modules from the syllabus schedule
Moving (copy and paste) content from your source syllabus to the Canvas course areas is a little easier if you can use your MS Word or Google Doc version of your syllabus. Copying content from a PDF file can take a little more reformatting effort.
Setting the Course Image Tile
I am going to tackle the easiest part first, which is setting the course tile image using the image found in the syllabus.
- On the source document, right click the image and choose the Save Image As an option to save the image to your Downloads directory.
- In your Canvas course, click the Settings link on the course dashboard.
- Under the Course Details tab, click the Choose Image button.
- You can either browse to the downloaded image on your computer, or drag and drop the downloaded file onto this window
- Click the Update Course Details button near the bottom of the screen.
Adding the Course Syllabus
Next up, we will add the syllabus information to the course Syllabus section.
- In your Canvas course, click the Syllabus link on the course dashboard. It may be “grayed out”, but that only means that nothing has been added there yet.
- On the Syllabus page, click the Edit button in the upper right. You are presented with the visual rich text editor (RTE).
- On the source syllabus document, select everything (CTRL-A) and copy the contents to the clipboard (CTRL-C).
- Back in the RTE, paste the clipboard contents into the edit window (CTRL-V).
- Save your work by clicking the Update Syllabus button near the bottom.

You probably noticed that in our sample, not everything from the source document pasted into the rich text editor. None of the images pasted into the RTE, which included the course schedule. For the course schedule, I would suggest recreating the table. So, I am going to export the original images from the source syllabus (right click and save image as) and then upload the images to their appropriate spot using the RTE embed image button.
There is also a little bit of cleanup that I would like to perform on the layout of the text. Since HTML tables are not all that friendly to accessibility screen readers, I will try to eliminate any unnecessary tables. I am going to move the email addresses out of the pasted table and up to the right of the professor and TA names. I am also going to move the class times and location out of the table. Finally, I am going to delete the table. Here are the from and to images:
FROM:
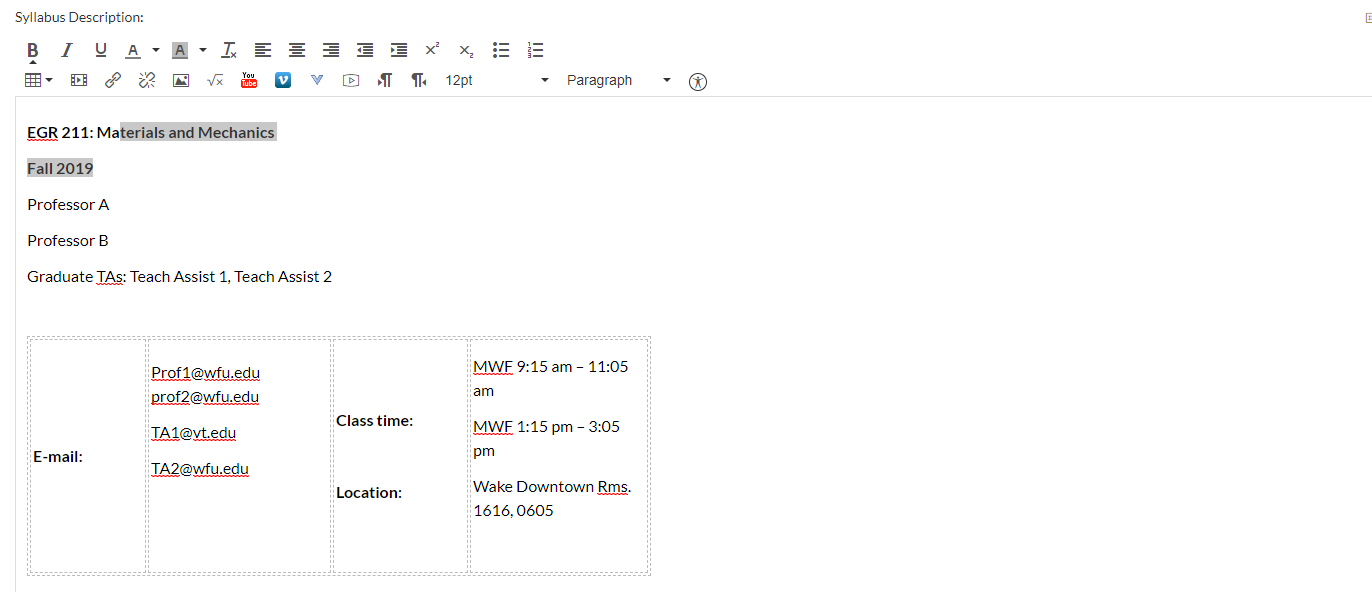
TO:
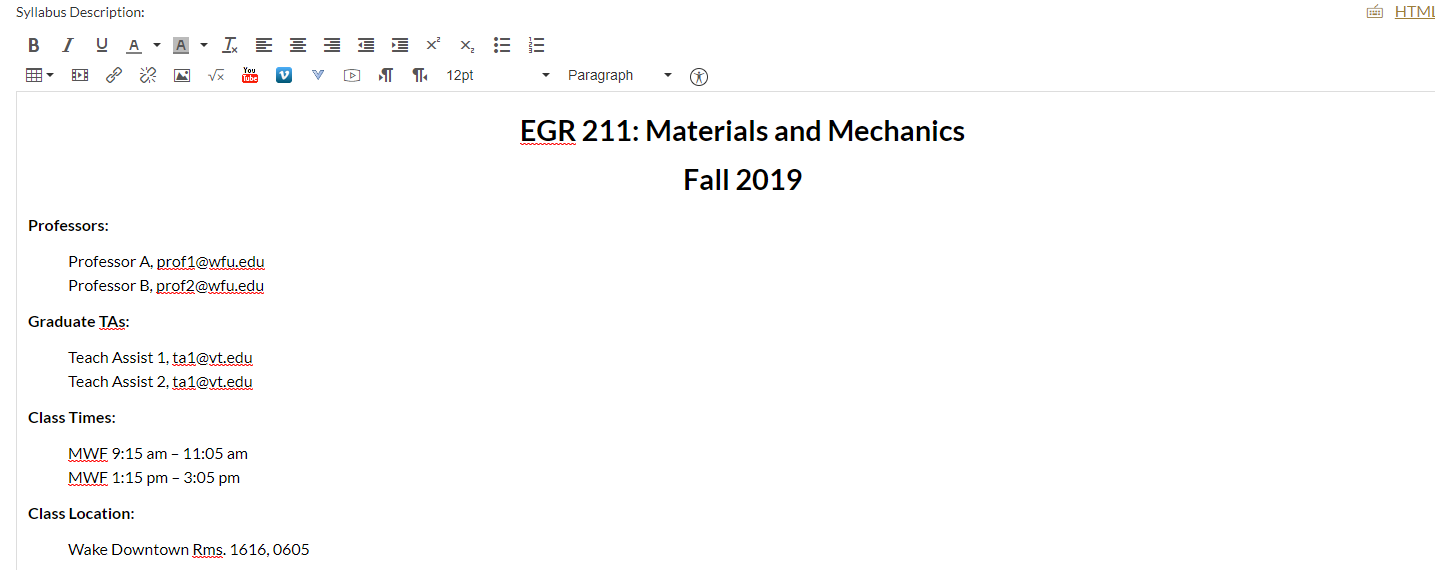
When working with tabular data, like the grading schema, you may need to present that data in a HTML table. Click the link for a video: How to make a table more accessibility friendly.
Creating Assignment Groups
The Grades section on our sample syllabus provides the source for our Assignment Groups and weighted grading criteria. Start by clicking the Assignments link on your Canvas course dashboard. We will need the following Assignment groups:
- ASSIGNMENTS
- LAB/CLASS PARTICIPATION
- LAB WRITE-UPS
- EXAM 1
- EXAM 2
- FINAL EXAM
You should find that there is already a default group called Assignments. So, all we need to do is create the other groups. To add a group:
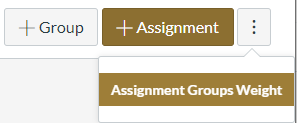
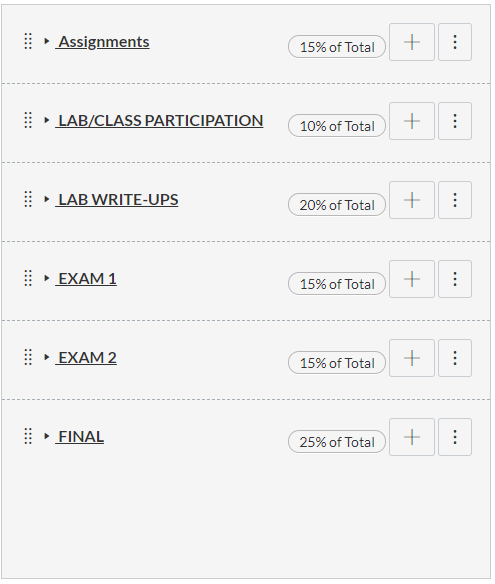
Next, we can add the grade weighting from our syllabus. In the upper right, click the button with the 3 vertical dots next to the +Assignment button and then click the Assignment Groups weight button.
You can now add grade weighting to the assignment groups as specified in the syllabus.
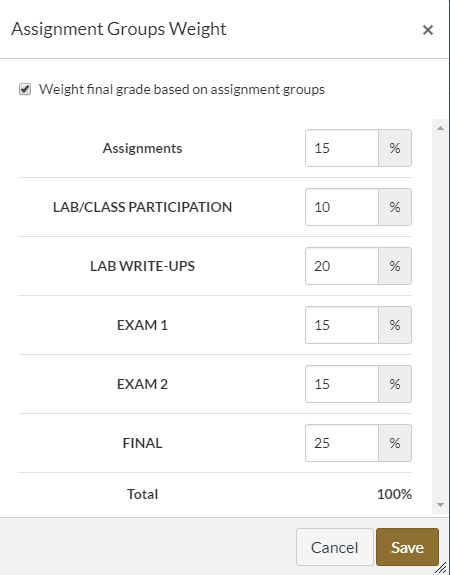
If everything is successful, you will now see the grade weighting in the Assignments dashboard.
Find out about adding rules to Assignment Groups
Creating the Assignments
Using the syllabus course schedule as a guide, I can see that we have 13 items for the Assignment groups, 5 labs/class participation items, and 5 lab reports. Start by adding the first assignment.
- Click the + button on the Assignments group.
- Choose the assignment type.
- Enter Assignment as the name (you can change the names later).
- Enter a “default” point value.
- Click the Save button.
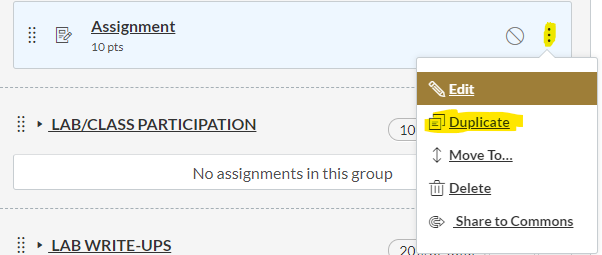
Now, you can easily create 12 more assignments for this group by clicking the 3 vertical dots on the right hand side of the new assignment and choose Duplicate. After duplicating the number of assignments that you need, You can change the details of the assignment (assignment name for instance) by clicking the 3 vertical dots on the right.
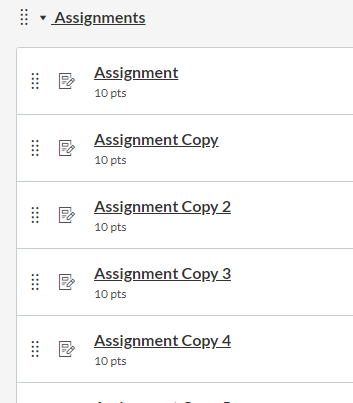
Repeat the same process for adding the lab/class participation items and the lab report items. Finally, add one assignment for each of the Exam groups.
Find out more about Assignments
Creating Modules
The last component that we can frame out in Canvas using just the information contained in the syllabus is Modules. Again using the syllabus course schedule as a guide, we can identify 3 Modules to create in Canvas:
- Structure, Processing, Properties of Materials
- Performance (Static Loading) of Materials
- Performance (Dynamic Loading) of Materials
We can also identify which of our assignments can be contained within each learning module:
- Structure, Processing, Properties of Materials
- Lab 1 – Structure of Materials
- Assignment 1
- Assignment 2
- Assignment 3
- Lab 2 – Properties of Materials
- Lab Report – Structure of Materials
- Exam 1
- Performance (Static Loading) of Materials
- Assignment 5
- Assignment 6
- Lab Report – Properties of Materials
- Assignment 7
- Lab 3 – Beams in Bending
- Assignment 8
- Lab Report – Beams in Bending
- Assignment 9
- Lab 4 – Column Buckling
- Exam 2
- Performance (Dynamic Loading) of Materials
- Lab Report – Column Buckling
- Assignment 10
- Assignment 11
- Assignment 12
- Lab 5 – Vibrations in Systems
- Assignment 13
- Lab Report – Vibrations in Systems
Start by clicking the Modules link on your Canvas course dashboard. Create the four modules as listed above.
- Click the +Module button on the upper right.
- Type in the desired name of the module.
- Click the Add Module button.
After creating the module, you can add the previously created assignments to the modules by:
- Click the + button on the right of the module panel.
- Select the assignments (CTRL-Click for multiple selections) that are appropriate for the module and click the Add Item button.
- Drag the assignments into the correct order for the module using the “scrubber” handle.
You can build out the remaining modules using the same procedure.
Complete
As you can see, we were able to build out four key components of our Canvas course using just the syllabus. All that is left is adding the content, and setting release dates, to the assignments.
When students arrive in your Canvas course, it is helpful if they see information on how to get started. You can create a custom course home page where you can add a welcome message.
How? Set the home page to a Pages “Front” Page and add your content. (There are 5 options for a Home Page in Canvas: Recent Activity Dashboard, Pages Front Page, the Course Modules, the Assignment List, or the Syllabus.) See “How do I change the Course Home Page?”
Categories: Tech Tip
