Qualtrics – Using Quotas
Qualtrics is an excellent tool for scheduling student presentations in your class, creating a signup for a class you may have over multiple days, or even scheduling professor/student conferences. However, there may be instances when you will want to limit the number of students that can sign up for a particular time or eliminate a choice based on availability. Using Qualtrics and the embedded functionality of Quotas will allow you to control the number of participants that can be scheduled for a particular day/time.
This tutorial will instruct you on how to create quotas, how to make choices disappear once a choice has been filled, and how to make choices disappear after the date of the choice has passed.
Creating a Quota
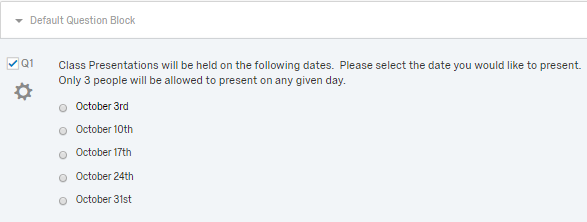
- Create a multiple choice question. Here is an example.
- Click on Tools from the menu at the top and then select Quotas.
- Click Create Multiple Quotas – at the bottom of the screen.
- Click Add a Question – select the question that you will utilize for your quota.
- Let’s start at the top and work our way down.
- Question appears at the top with options available for you to choose. If you want to create a quota on the number of people who can respond to this question then you will change 100 to your desired quota. Directly to the left you will change the Action of the question – what happens when the quota is met. (Based on the question that I created, I would rather put a quota on the answer choices instead – so I am going to leave this at 100.)
- Choices are located below and those also have options available for each.
- In my question I specified that only 3 people could present on any given day so my quota would be 3. In the first box I will change the count from 100 to 3.
- Name can stay the same
- Action when Quota is met can stay the same in this example.
- Change the count for each of my choices and then click the green Create “#” of Quotas button at the bottom of the page.
- Save
Choices Disappear when Quota is Met – Display Logic
- Click on one your multiple choice items, then click on the down arrow to the immediate right. Select Add Display Logic.
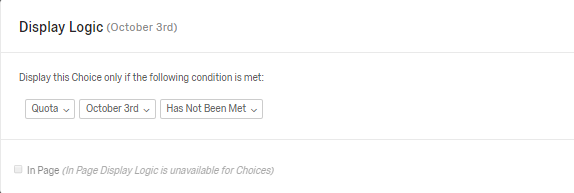
- In the next three drop down boxes, choose the following options – Quota, the Answer Choice, and Has Not Been Met. Click Save
- Repeat these steps until Display Logic has been added to all choices.
Choices Disappear after Date has Passed
In this example, October 3rd has passed and you no longer what that option to be displayed.
- Click on Survey Flow.
- On the block of questions, click on the Add Below option
- Choose Embedded Data
- Type in Date in the first field
- Click on the Set a Value Now option located directly to the right.
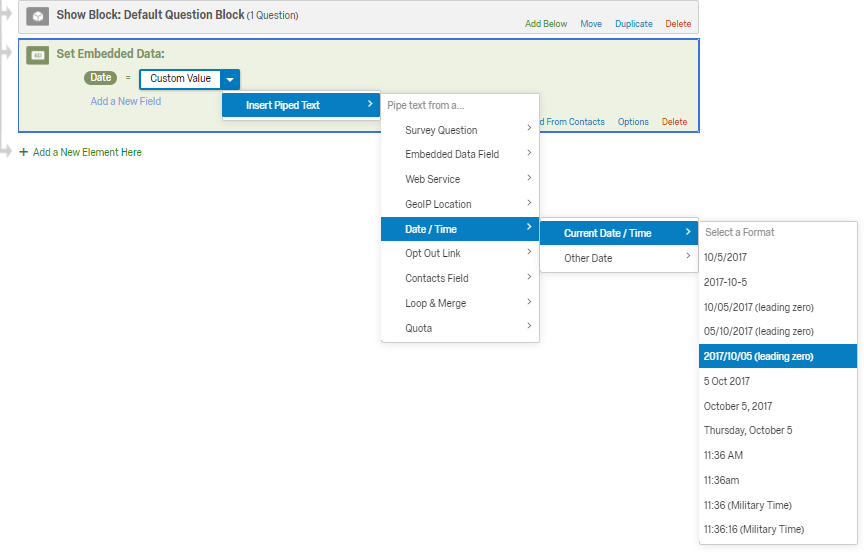
- Click on drop down arrow and select Insert Piped Text, Date/Time, then Current Date/Time. Next choose the option that is today’s’ date but in this form 2017/10/05 (leading zero)
- Save Flow
- Go back to the question and select the first answer choice, then select Edit Display Logic
- Click the “plus” symbol beside the first condition and choose AND
- Select Embedded Data in the first field. In the second field type in Date, and in the third field type in the date of the choice in this format. In my example I would type 2017/10/03.
- Save
- Repeat Steps 8-11 for all choices.


