Qualtrics – Using Authentication in your Survey
Using Authentication in your survey will accomplish a couple of important tasks for you. The authentication protocol will first limit your participants to WFU users allowing the use of an anonymous link instead of having to create a contact list in Qualtrics. The second thing authentication accomplishes is that it will then capture the username, first/last name, and email address of the respondent without having to ask these particular questions in the survey itself.
Qualtrics offers various authentication methods, however, this tutorial will concentrate on using Shibboleth. To set up authentication in your survey follow these steps:
- Click on Survey Flow from the editing menu.
- Click on Add a New Element Here.
- Click on Authenticator.
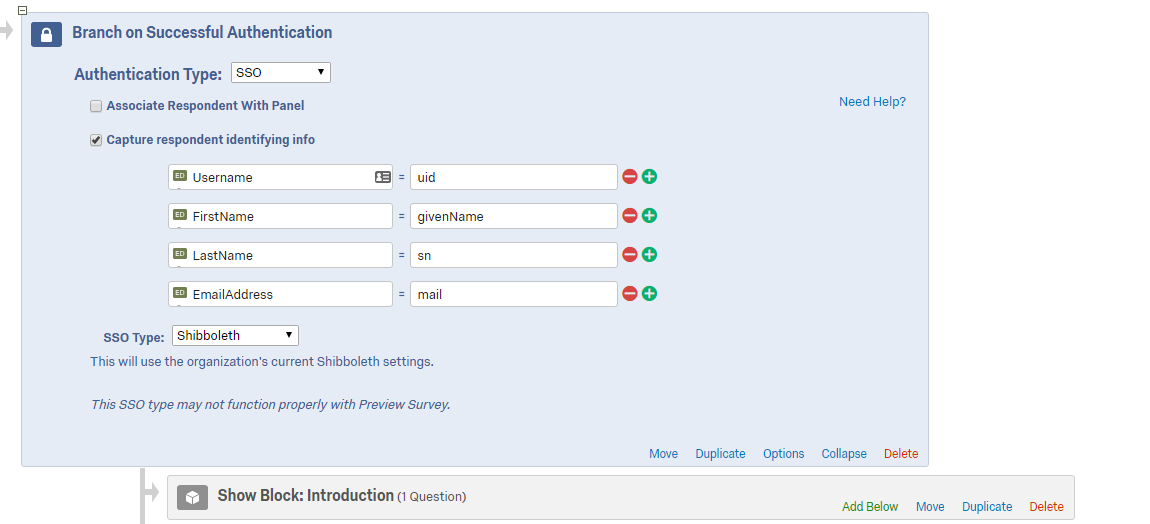
- For Authentication Type – choose SSO.
- Check the box labeled – Capture respondent identifying info
- Click on Add embedded data
- First field type Username and second field type uid. Click the green plus symbol.
- First field type FirstName and second field type givenName. Click the green plus symbol.
- First field type in LastName and second field type sn. Click the green plus symbol.
- First field type in EmailAddress and second field type mail.
- SSO Type: Choose Shibboleth
- The next step is to Move the authentication branch to the top of the survey. To do this simply click the the Move link and drag it to the top.
- Once moved, then you will need to move the block of questions directly below the authentication branch as seen below
****Google OAuth 2.0 is another option for SSO Type and you may be wondering why this method was not chosen since we utilize Google Mail. What we found is that if the participant had not set up their Google + then Qualtrics was unable to capture their identifying information.*******
Please contact Jeff Nichols (nicholjm@wfu.edu) or Richard King (kingre@wfu.edu) for help on this or more information.


